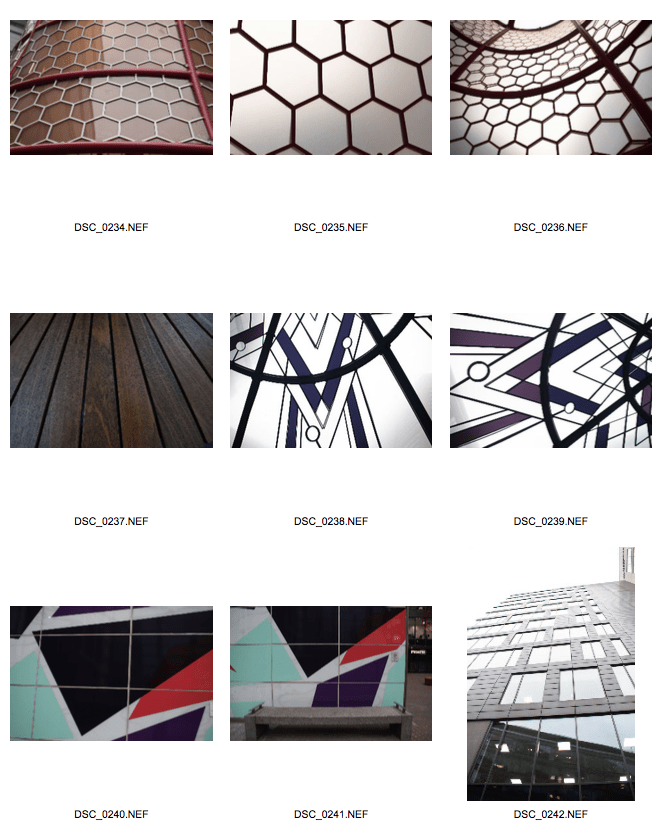
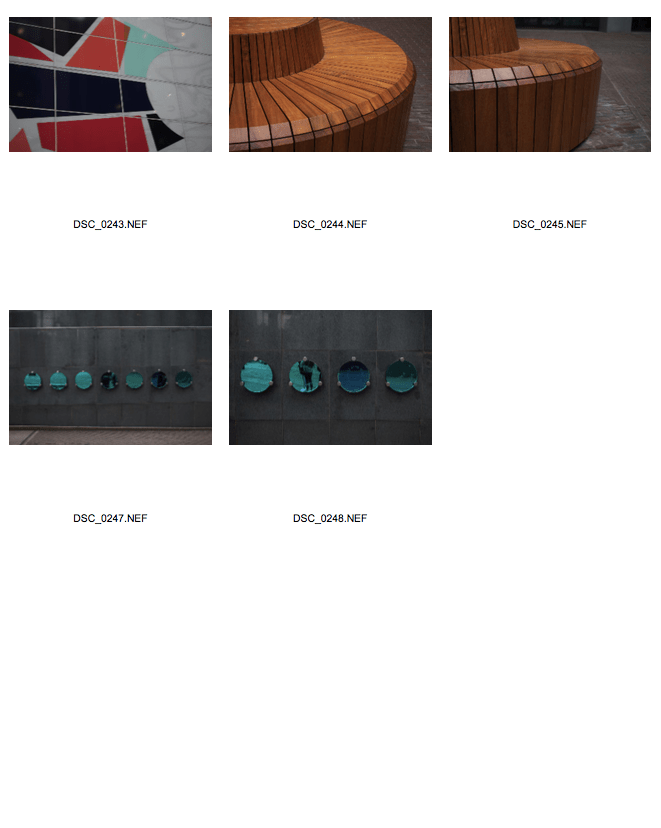
FINAL IMAGES – VISUAL DEVELOPMENT

Light and Shadow

This slideshow requires JavaScript.

I chose these images as my final 4 as they are by far the most effective images. The urban feel from the abandoned bus station and the black and white effect gives the images an interesting and mysterious feel to them, and the desaturation also makes the contrast between the light and shadows stand out. I also think these images have visual impact when you look at them for the above reasons.
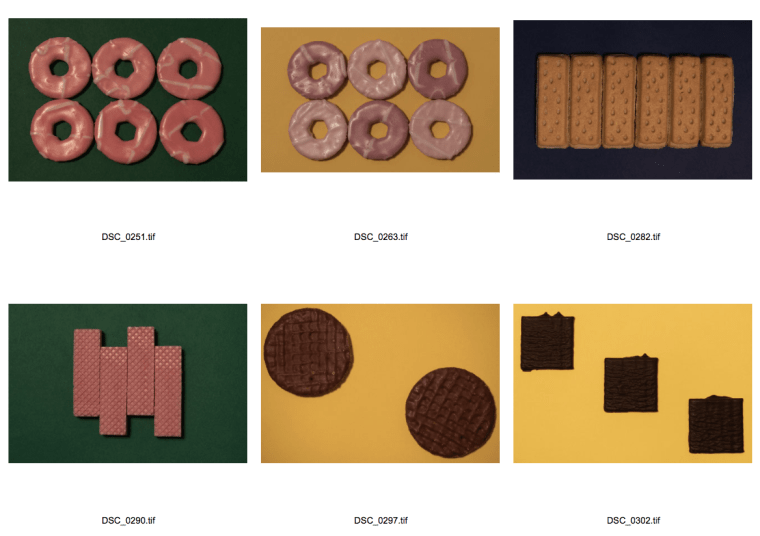
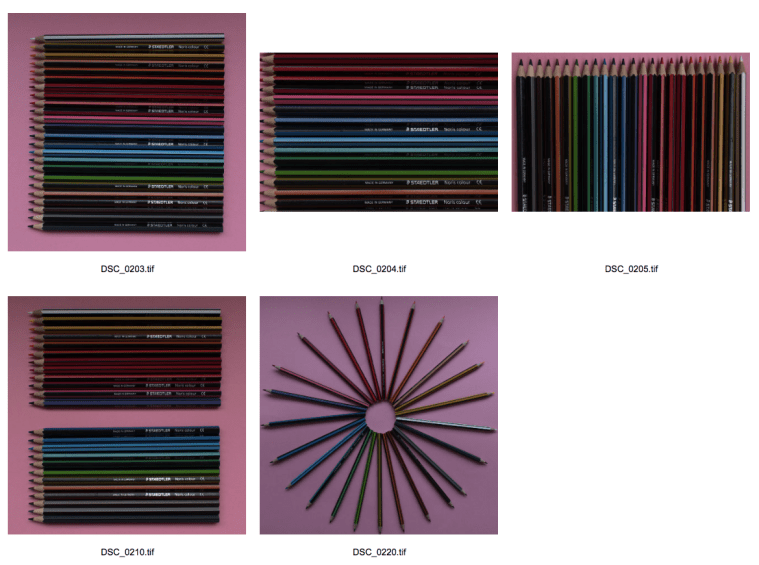
 

Everyday Geometry

This slideshow requires JavaScript.

The reason I chose the above images for this assignment was because they are the most accurate of the images I have produced; it’s incredibly difficult to get these kind of images 100% perfect, but I feel that these are as close as it gets. I also really like the impact these images have from the bright coloured backgrounds which compliment the colours of the subjects themselves, thanks to using the colour wheel for reference. Biscuits are also a less obvious subject choice than fruit, and I feel that the variety in compositions compliment each other well.
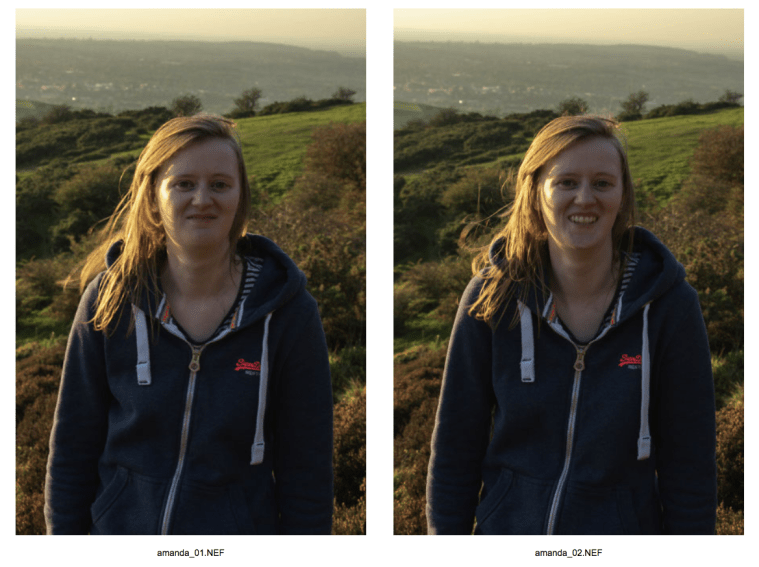
 

Who’s Who

This slideshow requires JavaScript.

These images are my final 4 because the concept of “what makes us unique” got me really intrigued and I feel like my results were so successful because of this genuine interest in the concept. I also feel like the extreme close-ups provide a unique perspective to the assignment that other people may not have produced, as it is easy to look at this brief and take a standard, stereotypical “portrait” image of the person’s face and shoulders, and I wanted to produce something more bold and with a deeper meaning. I also think the black and white effect combined with the close-up composition make the images feel very intimate and beautiful to look at.


Printing these images was a difficult task to understand at first, but after I got the hang of it I really enjoyed seeing my images printed in a physical copy in front of me. I chose Permajet Matte paper in 285gsm and Royal Gloss in 310gsm to create a professional feeling thickness and quality to the paper, to avoid them being flimsy or low quality. I chose Matte paper for the Light and Shadow images as I felt like avoiding the glare from glossy papers would show up more of the details and shadows in the images more successfully. I then chose the Royal Gloss paper for Everyday Geometry so that the shiny, glossy effect would further make the bright colours stand out and really make them pop, and the same paper type for Who’s Who to give the black and white images an even more luxurious feel and make the intimate details on the subject’s face really stand out. I ensured that each set of 4 images was placed in the exact same place on each page to successfully communicate they are part of a set, and used a slightly different composition for each set to keep them separate from each other. I used a white border around the edges to frame them and make further use of the space on the page.

What Makes Us Unique – VISUAL DEVELOPMENT – Who’s Who

After a recent group tutorial, I expressed my concerns to my tutor Rick about the Who’s Who assignment; I have anxiety and am very shy and nervous around new people, therefore I have really been struggling to approach strangers and ask to take their picture for this assignment. I have made numerous attempts and trips with the intention to take these kind of images, such as around the university campus and in Manchester city centre, but each time I have unfortunately been unable to produce any images. Therefore, Rick very kindly said that if I absolutely couldn’t approach strangers, then I was able to photograph friends and family if it made me feel more at ease. Although my images were successful from the scheduled workshop where we approached people on campus in a group, I was told that using this images for my final pieces would appear lazy and would give the wrong impression that I hadn’t undertaken any work on this assignment in my own time, therefore I was determined to get some more visual development images produced.

With this in mind, I reverted back to my previously made Pinterest boards to find inspiration for a shoot for this assignment, this time using familiar faces as the subject. The idea that stood out to me the most was a series of square images which are very close-up to the person’s face; effective images of the person’s unique facial features such as eyes, nose, hair, lips and unique markings on the skin such as moles, scars and veins. I instantly knew that this idea would make a perfect set for my final four images as each image would tie in with the next, and I find the concept so fascinating of how each person on this planet has their own unique, individual features that are nothing like anybody else’s; they are a combination of two individual’s features, and even though many people have siblings or twins, still no two people are exactly alike.

Below are some examples of the work that inspired me and the kind of thing that I aspired to produce:


I thought that it would be interesting to photograph more than one person to not only choose the most successful results, but also to explore in more depth the individuality between two very different kinds of people, varying in both age and gender.

My first subject was my mum, an “older” female who would give a unique perspective for her demographic. I chose to heavily photograph her eyes as she has a very rare condition called “Heterochromia” where the iris in her eyes are two different colours: one green, and one blue, although this does not affect her vision. This added further depth to my project as I was producing results that were showcasing a very unique trait. I also photographed her hair as it is a less common hairstyle, and people often say that they can recognise her from far away or remember her simply due to her unique hairstyle. I also tried to photograph some of the unique markings on the side of her face, such as a blue mark that also isn’t often seen.

Here are the original images:


The next day, I chose to photograph my boyfriend who would provide a completely different perspective from a young, male point of view. We have been dating for a long time and therefore I also felt more comfortable taking intimate photos of his face, and I feel that the romantic connection also provides me with a deeper insight into what makes him unique, as I often admire his individual features when looking at him. I chose to photograph his eyes as they are often known as “the windows to the soul” and everyone has unique eyes, his being a beautiful shade of brown. I also photographed his hands as each person has their own individual fingerprints and prints on their hands, and people often say that you can tell a lot about a person from their hands. Other features I photographed were unique markings such as moles, scars and veins in the arms. I also focused on his beard and hair as these are both ways that people choose to express themselves and show who they are through their appearance.

These were the results:

This slideshow requires JavaScript.


Then, I edited the images of my boyfriend as I felt like these were more successful. I chose to make them black and white so that they would clearly appear to make a set of images that all belong together, and cropped them into squares to focus more closely on the individual features being photographed, and remove any distracting backgrounds. I think that I will choose my final images from these photographs.

Biscuits Shoot – VISUAL DEVELOPMENT – Everyday Geometry

Biscuits and chocolates were my next subject idea for this assignment, as they aren’t organic and are mass produced and shaped by machinery, therefore I hoped that each individual item would be the same size and shape, eliminating some of the chances of inaccuracy. I searched the supermarket shelves to find a variety of interesting snacks that were also shaped geometrically and that I could envision would make effective compositions. Party Rings, Chocolate Rounds, Shortbreads, Pink Panthers, Chocolate Digestives and After Eight Mints were all chosen to be my subjects; the most challenging of them were the ones coated in chocolate, which always held the possibility of melting and left the occasional mark on the card I used in the background. It was great fun to experiment with compositions and arranging these delicious treats into eye-catching, novelty images that I think will form an interesting set as a group of 4, with similar subject matters carried across each image. Also, I took the feedback from the last tutorial into account and chose the coloured card in the background by referring to the colour wheel and using complementary colours to further make the images pop.

Here are the original images:

This slideshow requires JavaScript.


Next, I chose the most successful, accurate images and took them into Camera Raw and Photoshop to use the pipet tool to selectively choose individual areas of the images and change the Hue, Luminance and Saturation of the colours to really make the colourful backgrounds pop, and make the subject matter stand out from the background. I wanted these images to have high impact due to the bright colours and the novelty of using biscuits, with some nostalgic snacks from childhood in there such as the Party Rings and Pink Panther biscuits. These images are below:

Screen Shot 2018-12-09 at 23.58.55

Manchester Shoot – VISUAL DEVELOPMENT – Everyday Geometry & Who’s Who

This trip was originally planned with the intention to take more images for the Who’s Who assignment, outside of our scheduled workshops. Myself and 3 other students from the course decided to make a day trip into Manchester city centre, with the idea that asking strangers for a photograph would be easier in a larger and busier environment as nobody would know who we were, and we thought that this would make the process less daunting or embarrassing. However, despite my best efforts I was unfortunately still too anxious to approach people, as everyone was in a rush and too busy with their own lives and I found it too daunting to stop people and be an inconvenience to their day; I was also worried about how people would react to having their photo taken by a complete stranger. My fellow students also felt the same way.

However, we still made the most of this trip and found many different examples of geometry and shapes for the Everyday Geometry assignment. This trip around the city really opened my eyes to the amount of shapes and geometrical patterns that surround us every day, many of them which we don’t even notice. Benches, buildings and installations on walls were all items that we found to have geometrical shapes and these images all greatly inspired me for this assignment. Although I won’t use these images as my final pieces as they aren’t all flat lay or my own unique compositions, they have still influenced my thoughts and the direction I will take with this assignment.

Screen Shot 2018-12-09 at 23.17.32

Screen Shot 2018-12-09 at 23.17.44

Portrait Practice – VISUAL DEVELOPMENT – Who’s Who

On the same day as the Light and Shadow shoot at Teggs Nose, I also asked my friend if she would mind if I practiced taking her portrait to allow myself to get out of my comfort zone by photographing a person, while still photographing someone familiar, which made me more comfortable. The results from this shoot are only small, but I feel this was still an important step to making me more comfortable with the idea of photographing people, as this is something I have never done before. I tried to get the beautiful countryside landscape in the background, while creating a shallow depth of field to ensure the main focus of the image is still on the subject. I think the second picture is more successful because it shows more engagement between the photographer and the subject.

Screen Shot 2018-12-09 at 23.13.15

Pencils Shoot – VISUAL DEVELOPMENT – Everyday Geometry

After experimenting with organic matter with the fruit from the last Geometry shoot, I decided to try using a different type of everyday item to photograph. Pencils are used by most people everyday and are mass produced in a sturdy material like wood, which means that each pencil in a new pack should be the same shape and size and they are easier to arrange and compose. I arranged the pencils on some baby pink card that contrasted very effectively against the colours of the pencils. I placed them in the same order that they appeared in the original packaging, to keep them in the order of the rainbow which creates a sense of order in the photograph. Then, I photographed them from varying focal lengths and changed the composition to create variety in my images.

Below are some contact sheets of the original images from this shoot:

This slideshow requires JavaScript.


I also took inspiration from Sakir Gökçebag’s images; in particular I tried recreating his image of the watermelon slices arranged in a circle by arranging my pencils in a circle, too, as both of them give an interesting “spiky” kind of texture to the image. Below is a comparison of Gökçebag’s image (left) next to one of my images (right):

Gokcebag watermelon circle  DSC_0220


Many of the images are underexposed and dark as I photographed them just before the sun was setting and I was losing light fast. I took the images into Camera Raw and Photoshop to try and brighten the images and exposure, and also add Lens Corrections to remove any weird curving and distortion of the images. The best images are below:

Screen Shot 2018-12-09 at 22.44.51


UPDATE: 23/11/2018

After the group tutorial today, I was given feedback on these images. My peers said that these images are more effective than those from the fruit photoshoot, however they aren’t yet “perfect” as the pencils are aligned slightly wonky and aren’t immaculately straight, whereas geometry is all about “perfection” and accuracy. Another thing that was pointed out was that the pencils aren’t all facing upwards with the writing facing the camera, therefore it would be even more effective and pleasing to look at if the images were retaken with the writing facing the same way, ensuring the pencils were even more uniform. I may retake these images if I have time, but first I will continue exploring new ideas and undertake a photoshoot with biscuits and similar items, as I feel like this will create an effective set of images, whereas it would be harder to create 4 interesting images with this single media.

Teggs Nose – VISUAL DEVELOPMENT – Light and Shadow

Another experimental shoot I undertook for the Light and Shadow assignment was a trip to a local country park called Teggs Nose. This particular day, the sun was shining bright and the many brick walls and fences were casting shadows across the stunning country fields. I decided to take out my camera and again experiment with the exposure settings (shutter speed, ISO and aperture) to effectively capture these shadows and areas of contrast in the fields. My hometown of Macclesfield is quite a rural area and so capturing the light and shadows in this type of area also adds a personal touch to my assignment as it feels like home to me and therefore adds some personality into my work. I enjoy shooting landscapes in particular, and so I like the element of capturing light and shadows for the assignment brief, but also adding a personal touch and more depth to the images by also capturing a successful landscape photograph which can be used in both circumstances.

One thing in particular that caught my eye were the houses and outbuildings that were hiding in the shadows of the hill which was the vantage point I was standing on, as seen in the image “teggsnose_08.NEF.” This could be interpreted in many ways by the viewer, such as the people living in this house are hiding away in the shadows, separated from the rest of the world that are living in the light.

When I presented these images in a group tutorial, the feedback I was given mentioned that these images focus heavily on shooting the landscape itself and aren’t so focused on the shadows themselves. The image of the house hiding in the shadows was praised as this shows that I am paying closer attention to the shadows in the scene, rather than the surrounding landscape. I don’t think I will use these images as my final pieces as country fields and landscapes are quite commonly photographed and could be perceived as “boring,” and I would like my final images to stand out for the right reasons.

Below is a contact sheet of the images from this shoot:

Screen Shot 2018-12-09 at 21.40.09

Shadows Around The Home – VISUAL DEVELOPMENT – Light and Shadow

After the initial shoot in Hanley for Light and Shadow, I was very happy with the images I produced, however I still wanted to look around for more ideas and the easiest, most sensible place to look was around my home. In doing this, I noticed that the chandelier in my bedroom casts shadows in interesting patterns and lines on my ceiling when the light is switched on, which appear in a repetitive and aesthetically pleasing pattern. These images were mostly for test purposes to experiment with capturing shadows and exploring how light and the surrounding objects can affect the shadows that are produced. I feel like this has also helped me understand the exposure on my camera more when shooting areas with light and dark areas, and areas of contrast.

Henri Cartier-Bresson – RESEARCH – Light and Shadow

Cartier-Bresson was born in Chanteloup-en-Brie, Seine-et-Marne in 1908. He developed a strong fascination with painting early on in his life, particularly with the subjects of Surrealism and Cubism. His camera of choice became the Leica, after spending a year in the Ivory Coast in 1932. After this moment, he began his life-long passion for photography. He created the Fondation Henri Cartier-Bresson in Paris in 2003 for the preservation of his work. Over his lifetime, he received an extraordinary number of prizes, awards, and honorary doctorates.

One of the main features of Cartier-Bresson’s work is “shadow play.” Shadows are areas that lack light; photography itself is all about painting with light, and you can’t have light without dark. Shadows can add another layer to our images, even creating two scenes within one frame by overlaying shapes and textures over any other given scene. An example of this is the below image of Cartier-Bresson’s, where what appears to be the shadow of a mosque is cast on the wall of another building. This adds religious connotation to the image which otherwise wouldn’t be there.

theory-of-composition-shadowplay

“While other photographers work around shadows, Cartier-Bresson uses them as little jokes, surrealist tools, and moveable backdrops to transform ordinary street scenes into photographs that make us wonder “How come I did not see that?”

Fruit Shoot – VISUAL DEVELOPMENT – Everyday Geometry

Taking inspiration from Sakir Gökçebag, I decided to experiment with photographing fruit for the Everyday Geometry assignment. I decided it would be best to use lemons, limes and kiwis, as these fruits are already quite round in shape, and I find that circles are a pleasing and calming shape as there are no sharp corners; they also have intriguing natural shapes inside them when they are sliced, such as triangles and the unusual shapes and seeds inside a kiwi fruit are particularly unique. Next, I bought a few different coloured pieces of card that I thought would contrast well against the chosen fruits, in colours such as yellow, green and orange. I tested out the most successful colour combinations between background and subject, and found that the green of the kiwis contrasted very effectively against the bright orange card. I also inverted the colours between the lemons and limes, using yellow card for the limes, and green card for the lemons. I sliced the fruit into circular slices and arranged them in various different compositions to find the most effective ones. At the end of my shoot, I found cutting these slices in half and forming triangular shapes was also effective, although I think I prefer the impact of the larger round slices.

Here is a slideshow of the original shots from this shoot:

This slideshow requires JavaScript.


Next, I chose the most successful images and edited them in Camera Raw to enable Lens Corrections which removed any slight curving at the edges, adjusted the exposure as the images were quite dark and underexposed, and used Photoshop to remove some of the markings on the card or slight imperfections in the fruit. This was the result:

This slideshow requires JavaScript.


UPDATE: 23/11/18

Today, we had an informal tutorial to present and discuss our images with our peers. I was given positive and constructive criticism from both my tutor and peers, such as: the simpler compositions such as “DSC_0156.tif” prompted a smile and created a calming, pleasurable effect as the round shapes and arranging the fruit in a line gives a sense of order. As fruit is organic matter, no two pieces of fruit are shaped exactly identically, therefore some imperfections and differences can be seen in the images, and I was told this takes away from the idea of “perfection and accuracy” in geometry; similarly, arranging the subjects freehand gave imperfect compositions and therefore I was advised to be more accurate when reshooting the images, such as drawing markings on the card and using a ruler to create identical spaces between objects. Then, I communicated my troubles with inconsistent lighting and shadows, and was advised to stand the subjects on bottle top lids to lift them further away from the card and reduce the shadows. Lastly, I was advised when choosing the colour for the card in the background, to look at the colour wheel and use complementary colours to show thought and consideration for the choice of background.

From this feedback, I have decided to do another shoot but this time using biscuits and sweets, as these are mass produced using machinery and will hopefully provide more identical subjects; I will also use rulers to more accurately place the items when composing the images, and hopefully both of these things will help produce more accurate and “perfect” geometrical images. I will also look at the colour wheel when choosing the right background, using opposite colours every time, showing my understanding of this important concept in art and design.